


 Log In
Gallien-Krueger Amplification 2 is a result of cooperation between Audiffex and Gallien-Krueger. It contains simulations of real-world models of bass gear, whose properties were acquired by exact measurements in professionally equipped laboratories of Brno University of Technology.
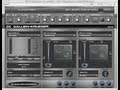
GK Amplification allows you to use one of three available amplifier models followed by a speaker model. The signal path ends by a pickup microphone. The Pro version offers an option of chaining two completely independent speakers in parallel.
Compared to our competition, we offer authentic and by no means "beautified" sound. It is only up to you what your GK Amplification will sound like. For your inspiration, we have created 60 presets.
Features
- Exact simulations of Gallien-Krueger bass gear
- 3 amp models
- 3 speaker models in 9 arrangements
- 8 microphone models
System Requirements
PC
- CPU with SSE2 support (Intel Pentium 4 or AMD Athlon 64 and newer)
- Windows XP, Vista, 7 (32-bit/64-bit)
- CPU speed 1.6 GHz, recommended 2 GHz
- 200 MB of HDD space
- VST/RTAS host application
Mac
- PowerPC G4, G5 or Intel Core
- Mac OS X 10.5+
- CPU speed 1.6 GHz, recommended 2 GHz
- 200 MB of HDD space
- VST/RTAS host application
Available Interfaces
- VST
- RTAS
Installing on Mac
1. Unzip and mount the provided disk image and run the installer.

2. Read through the License Agreement and select Continue to proceed with Installation.

3. You will now have to add your registration details, provide a Username, Organization and the Serial Number that will be in your PluginBoutique user account after purchase, you will also find the serial in your confirmation email.

4. Select the Install location. It will default to your Macintosh HD.

5. Installation is now complete.

Installing on Windows
1. Unzip and run the installer and follow the on-screen instructions.

2. Read through the License Agreement and select I Agree to continue with Installation.

3. Enter a User Name, Organization and the serial that we have provided after purchase. The serial can be found in your profile area.

4. Select the destination for your software to be saved.

5. Select which components you would like to install and then select Next to continue.

6. Then select where these will be stored or just click Next to use the default folder.

7. Select where you would like the program's shortcut to be held.

8. Your software is now ready to install. Select Install to proceed.

9. Installtion is now complete.

